Step by Step Detailed projects for your garden. DIY Woodworking plans and projects that are PDF Download and Print Friendly. The maker movement community loves to create and discover new ways of self expression through crafts!
This step by step diy woodworking project is about a 12x16 lean to pavilion plans. This gazebo has only 4 posts and it comes with large openings on all sides.
This step by step diy woodworking project is about 12x16 lean to pavilion plans. The roof has a 4:12 pitch and it features 12" overhangs on all sides. This design has only 4 posts, offering generous openings on all sides. This project features a sturdy structure with 6x6, 6x8 lumber and 2x6 rafters. *This is a PREMIUM PLAN*See full dimensions in the FEATURED IMAGES. The PDF file comes with:Cut Diagrams, Parts Lists3D diagrams with detailed step by step instructionsFull Cut & Shopping listsCut Layout Diagrams (show you how to cut the components, so you get minimal waste)Color Code (easily identify the components)Tools List, Time & Cost EstimateMeasurements are in imperialMeasurements are in imperial. The plans are for personal use only. MyOutdoorPlans or the its legal owners won't be liable for any loss, damage or injury arising from the use of information on this plan. It is your responsibility to make adjustments to the plans, to comply with your local building codes.Payment is managed by Gumroad and it is safe. Payment is secured by SSL with 128-bit encryption and processed with PCI Compliant service providers. Find out more here.Once payment is completed, you will receive an email from Gumroad (look in spam folder as well). Inside the email you have a VIEW CONTENT button. Press the button, then Download.
This video is about how to build a lemonade stand. If your little one has entrepreneurial skills or you simple want to keep him/her busy during the summer, this project will provide tons of fun. This project is designed to keep the costs down and be efficient with the materials used.
The Premium Plans (see link above) will guide you from start to finish with everything you need to know for a successful project. Therefore, you get 3D diagrams, instructions and a full Cut & Shopping list. PDF download and Print friendly.
The lemonade stand has a roof to create some shade during the hot summer days. In addition, I added wheels to the stand so you can move it from one location to another with ease. The lemonade stand has also two handles.
Therefore, please watch the video for 3D complete view and details on the bench and then go to my website for the actual measurements, for the diagrams and instructions.
I've got you covered with step by step plans, 3D diagrams, instructions and a full Cut & Shopping list. You can even Print or save the plans as PDF, everything being free 24/7. If you like this video, you should also take a look over the rest of my designs!
My free plans come with a cut list, a shopping list and step by step diagrams. Lots of tips and PDF download format available. #pergola #pergoladesign #porchmakeover
This is the 24x24 pavilion we built from your plans! We built it back in November of 2021. Once the pad was poured, it took two full weekends with 6 men.
If you want to build a beautiful 15x10 outdoor pavilion with gable roof, these premium plans with step by step 3D diagrams and instructions will help you save time, money and get the job done in a weekend. This large wooden pavilion is built on a sturdy 6x6 and 6x8 lumber, with 2x6 rafters. The pavilion features a gable roof with a 4:12 pitch with generous overhangs on all sides. The base of the pavilion is 15'x10'. You can use pressure treated lumber for the pavilion, or invest in something weather resistant like cedar or redwood.*These are PREMIUM PLANS*See full dimensions in the Featured ImagesThe PDF file comes with:Cut Diagrams, Parts Lists3D diagrams with detailed step by step instructionsFull Cut & Shopping listsCut Layout DiagramsTools List, Time & Cost EstimateMeasurements are in imperialMeasurements are in imperial. The plans are for personal use only. MyOutdoorPlans or the its legal owners won't be liable for any loss, damage or injury arising from the use of information on this plan. It is your responsibility to make adjustments to the plans, to comply with your local building codes.Payment is managed by Gumroad and it is safe. Payment is secured by SSL with 128-bit encryption and processed with PCI Compliant service providers. Find out more here.Once payment is completed, you will receive an email from Gumroad (look in spam folder as well). Inside the email you have a VIEW CONTENT button. Press the button, then Download.
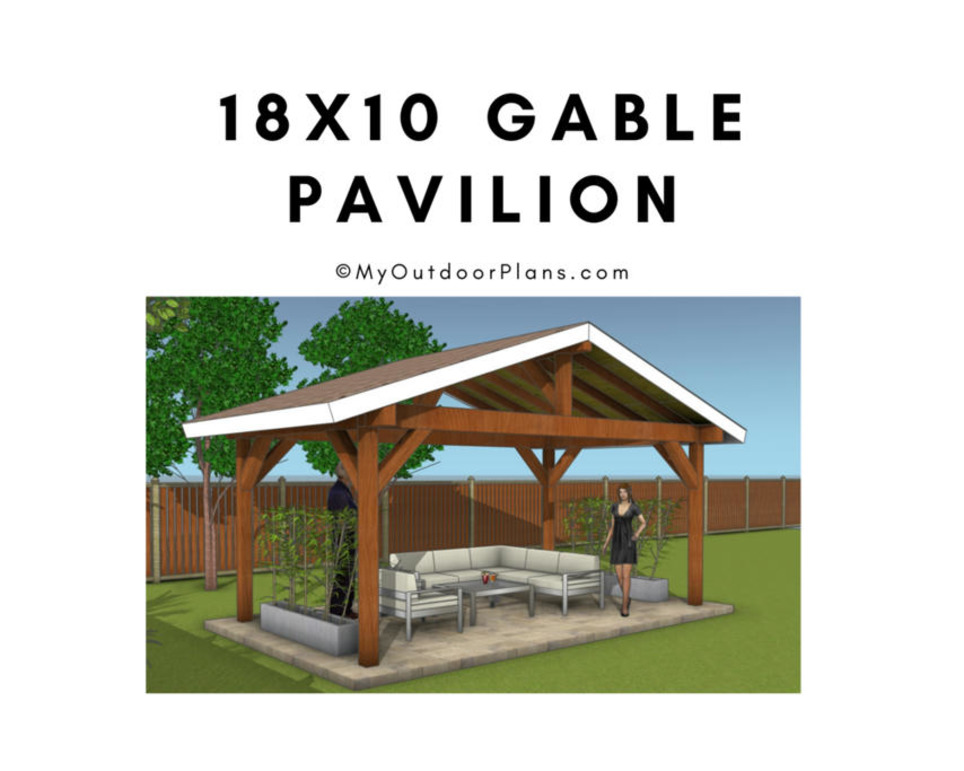
If you want to build a beautiful 18x10 outdoor pavilion with gable roof, these premium plans with step by step 3D diagrams and instructions will help you save time, money and get the job done in a weekend. This large wooden pavilion is built on a sturdy 6x6 and 6x10 lumber, with 2x6 rafters. The pavilion features a gable roof with a 4:12 pitch with generous overhangs on all sides. The base of the pavilion is 18'x10', outside post to outside post. You can use pressure treated lumber for the pavilion, or invest in something weather resistant like cedar or redwood.*These are PREMIUM PLANS*See full dimensions in the Featured ImagesThe PDF file comes with:Cut Diagrams, Parts Lists3D diagrams with detailed step by step instructionsFull Cut & Shopping listsCut Layout DiagramsTools List, Time & Cost EstimateMeasurements are in imperialMeasurements are in imperial. The plans are for personal use only. MyOutdoorPlans or the its legal owners won't be liable for any loss, damage or injury arising from the use of information on this plan. It is your responsibility to make adjustments to the plans, to comply with your local building codes.Payment is managed by Gumroad and it is safe. Payment is secured by SSL with 128-bit encryption and processed with PCI Compliant service providers. Find out more here.Once payment is completed, you will receive an email from Gumroad (look in spam folder as well). Inside the email you have a VIEW CONTENT button. Press the button, then Download.
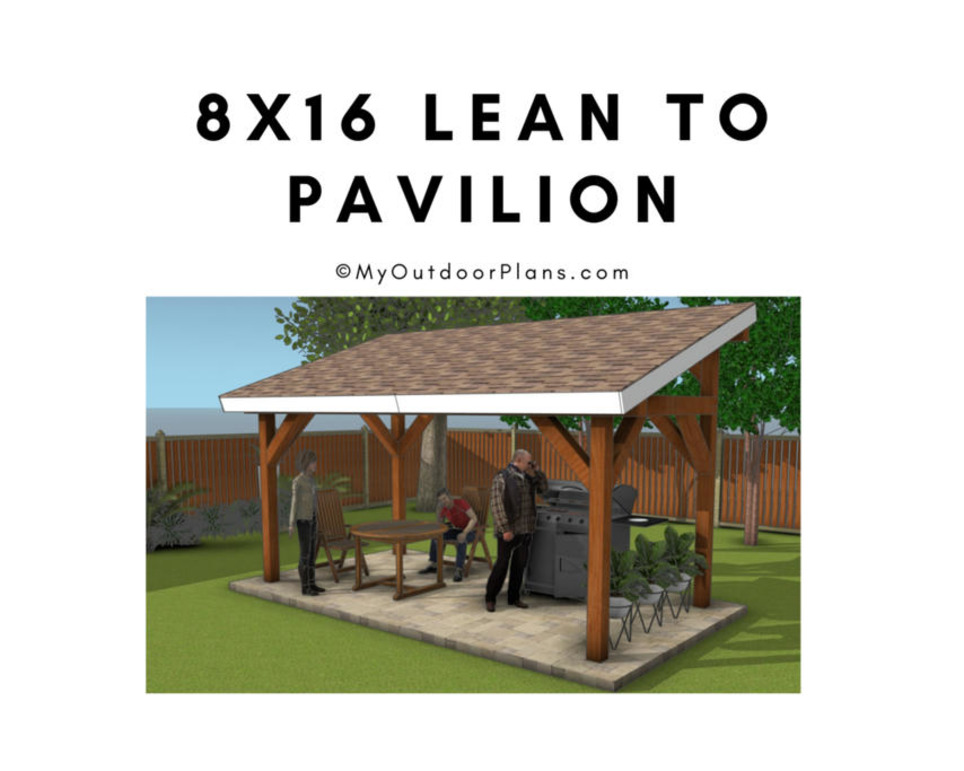
This step by step diy woodworking project is about 8x16 lean to pavilion plans. The roof has a 4:12 pitch and it features 12" overhangs on all sides. This project is ideal for your garden if you want to build a cover for your BBQ grill. This project features a sturdy structure with 6x6, 6x8 lumber and 2x6 rafters. *This is a PREMIUM PLAN*See full dimensions in the FEATURED IMAGES. The PDF file comes with:Cut Diagrams, Parts Lists3D diagrams with detailed step by step instructionsFull Cut & Shopping listsCut Layout Diagrams (show you how to cut the components, so you get minimal waste)Color Code (easily identify the components)Tools List, Time & Cost EstimateMeasurements are in imperialMeasurements are in imperial. The plans are for personal use only. MyOutdoorPlans or the its legal owners won't be liable for any loss, damage or injury arising from the use of information on this plan. It is your responsibility to make adjustments to the plans, to comply with your local building codes.Payment is managed by Gumroad and it is safe. Payment is secured by SSL with 128-bit encryption and processed with PCI Compliant service providers. Find out more here.Once payment is completed, you will receive an email from Gumroad (look in spam folder as well). Inside the email you have a VIEW CONTENT button. Press the button, then Download.
This step by step diy project is about 20x24 lean to patio cover plans. This lean to has a 1.5:12 pitch and it can be both used as a carport or as a patio cover
Loved these plans for the twin size bed made with 2x4s. Very easy and precise. Total material cost was under $100. Took us about a week using our spare time.
Rookie woodworker, built 2x4 twin bed frame for our daughter. Total for materials roughly $160 Canadian. Didn’t really keep track of time. Very fun project.
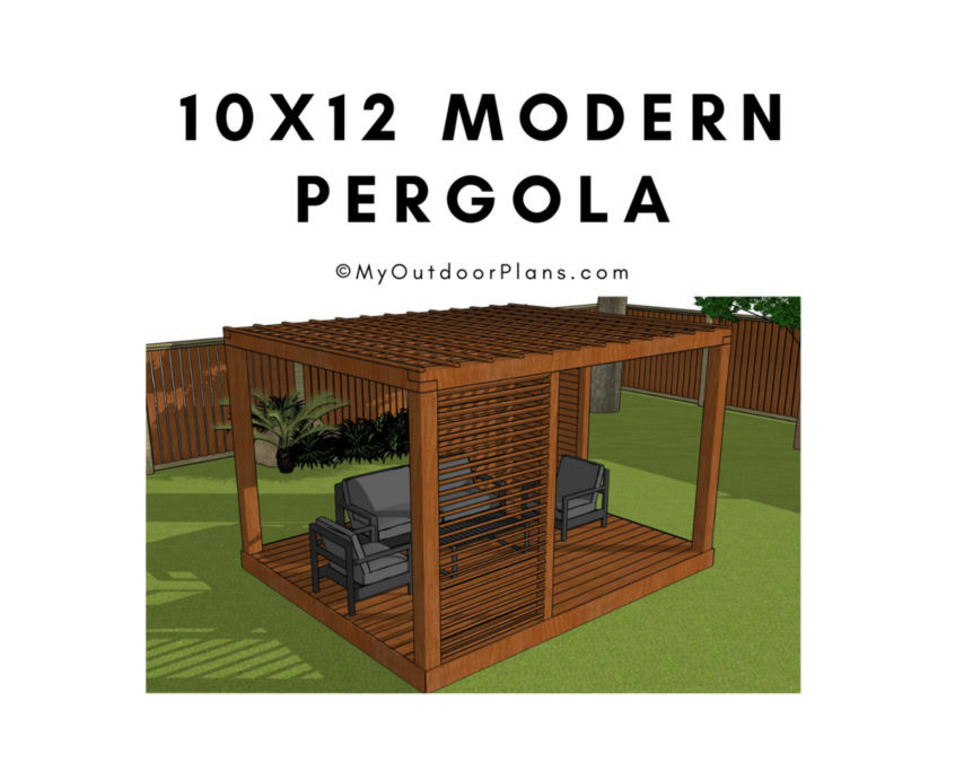
This step by step diy woodworking project is about 10x12garden pergola plans. This rectangular wood pergola has a modern design and it has a deck flooring with design elements on the roof and on the sides. You can create a lot of value with this pergola in your backyard, if you are looking for a unique project with modernist elements. *This is a PREMIUM PLAN*See full dimensions in the FEATURED IMAGES. The PDF file comes with:Cut Diagrams, Parts Lists3D diagrams with detailed step by step instructionsFull Cut & Shopping listsCut Layout Diagrams (show you how to cut the components, so you get minimal waste)Color Code (easily identify the components)Tools List, Time & Cost EstimateMeasurements are in imperialMeasurements are in imperial. The plans are for personal use only. MyOutdoorPlans or the its legal owners won't be liable for any loss, damage or injury arising from the use of information on this plan. It is your responsibility to make adjustments to the plans, to comply with your local building codes.Payment is managed by Gumroad and it is safe. Payment is secured by SSL with 128-bit encryption and processed with PCI Compliant service providers. Find out more here.Once payment is completed, you will receive an email from Gumroad (look in spam folder as well). Inside the email you have a VIEW CONTENT button. Press the button, then Download.
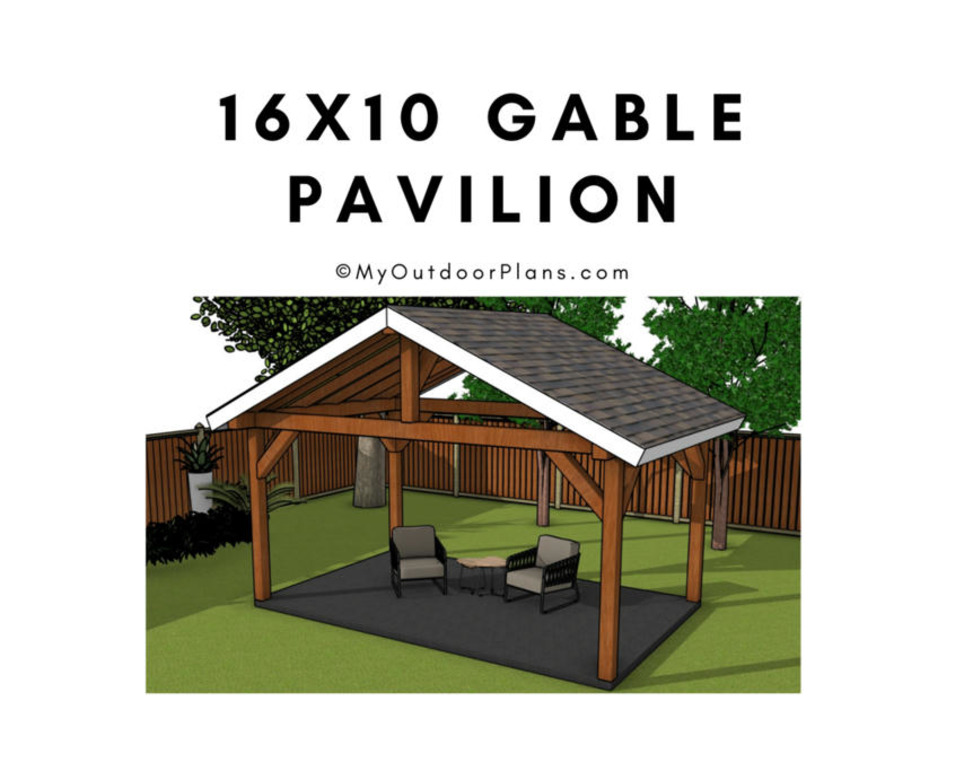
Step by step diy woodworking project is about a 16x10 wooden gable pavilion plans. This pavilion features a gable roof that is built on a 4 post structure.
If you want to build a beautiful 16x10 outdoor pavilion with gable roof, these premium plans with step by step 3D diagrams and instructions will help you save time, money and get the job done in a weekend. This large wooden pavilion is built on a sturdy 6x6 and 6x8 lumber, with 2x6 rafters. The pavilion features a gable roof with a 6:12 pitch with generous overhangs on all sides. The base of the pavilion is 16'x10'. You can use pressure treated lumber for the pavilion, or invest in something weather resistant like cedar or redwood.*These are PREMIUM PLANS*See full dimensions in the Featured ImagesThe PDF file comes with:Cut Diagrams, Parts Lists3D diagrams with detailed step by step instructionsFull Cut & Shopping listsCut Layout DiagramsTools List, Time & Cost EstimateMeasurements are in imperialMeasurements are in imperial. The plans are for personal use only. MyOutdoorPlans or the its legal owners won't be liable for any loss, damage or injury arising from the use of information on this plan. It is your responsibility to make adjustments to the plans, to comply with your local building codes.Payment is managed by Gumroad and it is safe. Payment is secured by SSL with 128-bit encryption and processed with PCI Compliant service providers. Find out more here.Once payment is completed, you will receive an email from Gumroad (look in spam folder as well). Inside the email you have a VIEW CONTENT button. Press the button, then Download.
This step by step diy woodworking project is about 10x12 free standing pergola plans. This rectangular wood pergola has a modern design and it is budget friendly, and it features 4 posts with a footprint base of 10 ft x 12 ft ft. This pergola design features partial blinds on the sides for an exquisite look and to create shade to the inside.This pergola features a sturdy structure with 6x6 posts and 2x6 rafters. *This is a PREMIUM PLAN*See full dimensions in the FEATURED IMAGES. The PDF file comes with:Cut Diagrams, Parts Lists3D diagrams with detailed step by step instructionsFull Cut & Shopping listsCut Layout Diagrams (show you how to cut the components, so you get minimal waste)Color Code (easily identify the components)Tools List, Time & Cost EstimateMeasurements are in imperialMeasurements are in imperial. The plans are for personal use only. MyOutdoorPlans or the its legal owners won't be liable for any loss, damage or injury arising from the use of information on this plan. It is your responsibility to make adjustments to the plans, to comply with your local building codes.Payment is managed by Gumroad and it is safe. Payment is secured by SSL with 128-bit encryption and processed with PCI Compliant service providers. Find out more here.Once payment is completed, you will receive an email from Gumroad (look in spam folder as well). Inside the email you have a VIEW CONTENT button. Press the button, then Download.
If you want to build a beautiful trash bin shed, these plans will help you get the job done. This shed is simple to build and it features compartments for 2 bins. It has 2 lids and two doors to the front, so you can collect the trash selectively. This shed will cover the trash bins and enhance the look of your garden. The shed is built on a 2x4 framing. Just a few common tools are necessary, so you don't need a fully equipped and fancy workshop to start making projects!*These are PREMIUM PLANS*See full dimensions in the FEATURED IMAGES. The PDF file comes with:Cut Diagrams, Parts Lists3D diagrams with detailed step by step instructionsFull Cut & Shopping listsCut Layout DiagramsTools List, Time & Cost EstimateMeasurements are in imperialMeasurements are in imperial. The plans are for personal use only. MyOutdoorPlans or the its legal owners won't be liable for any loss, damage or injury arising from the use of information on this plan. It is your responsibility to make adjustments to the plans, to comply with your local building codes.Payment is managed by Gumroad and it is safe. Payment is secured by SSL with 128-bit encryption and processed with PCI Compliant service providers. Find out more here.Once payment is completed, you will receive an email from Gumroad (look in spam folder as well). Inside the email you have a VIEW CONTENT button. Press the button, then Download.
Step by step diy woodworking project is about a 10x10 wooden modern pergola plans. This square pergola has a floor and side blinds, as distinct elements.
If you want to build a beautiful 12x10 porch gable pavilion plans, these premium plans with step by step 3D diagrams and instructions will help you save time, money and get the job done in a weekend. This pavilion is built on a sturdy 6x6 and 6x8 framing, with 2x6 rafters every 24" on center.The pavilion features a gable roof with a 6:12 pitch and generous overhangs on all sides. The base of the pavilion is 12'x10' outside post to outside post. This pavilion is attached to the wall of the house, making it the ideal cover for a front porch.Just a few common tools are necessary, so you don't need a fully equipped and fancy workshop to start making projects!*These are PREMIUM PLANS*See full dimensions in the FEATURED IMAGES. The PDF file comes with:Cut Diagrams, Parts Lists3D diagrams with detailed step by step instructionsFull Cut & Shopping listsCut Layout DiagramsTools List, Time & Cost EstimateMeasurements are in imperialMeasurements are in imperial. The plans are for personal use only. MyOutdoorPlans or the its legal owners won't be liable for any loss, damage or injury arising from the use of information on this plan. It is your responsibility to make adjustments to the plans, to comply with your local building codes.Payment is managed by Gumroad and it is safe. Payment is secured by SSL with 128-bit encryption and processed with PCI Compliant service providers. Find out more here.Once payment is completed, you will receive an email from Gumroad (look in spam folder as well). Inside the email you have a VIEW CONTENT button. Press the button, then Download.
Step diy woodworking project is about a 12x12 wooden modern pavilion plans. This is a project as it features a modern design with simple lines and no accolades.
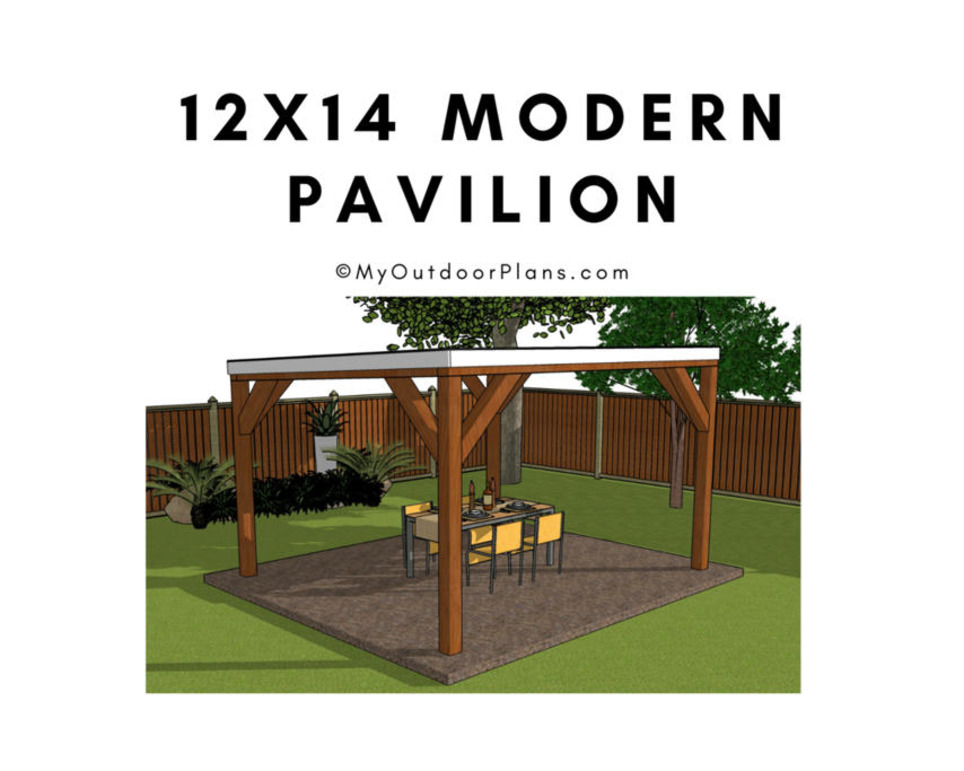
This step by step diy woodworking project is about 12x14 modern pavilion plans. This square pavilion has a modern design and it is budget friendly, and it features 4 posts with a footprint base of 12 ft x 14 ft ft. The roof has a 2.5 degree slope.This pergola features a sturdy structure with 6x6 posts, 6x8 top beams and 2x6 rafters. *This is a PREMIUM PLAN*See full dimensions in the FEATURED IMAGES. The PDF file comes with:Cut Diagrams, Parts Lists3D diagrams with detailed step by step instructionsFull Cut & Shopping listsCut Layout Diagrams (show you how to cut the components, so you get minimal waste)Color Code (easily identify the components)Tools List, Time & Cost EstimateMeasurements are in imperialMeasurements are in imperial. The plans are for personal use only. MyOutdoorPlans or the its legal owners won't be liable for any loss, damage or injury arising from the use of information on this plan. It is your responsibility to make adjustments to the plans, to comply with your local building codes.Payment is managed by Gumroad and it is safe. Payment is secured by SSL with 128-bit encryption and processed with PCI Compliant service providers. Find out more here.Once payment is completed, you will receive an email from Gumroad (look in spam folder as well). Inside the email you have a VIEW CONTENT button. Press the button, then Download.
This step by step diy project is about 8x10 greenhouse plans. I have designed this small greenhouse so you can grow fresh vegetables in your own backyard. This greenhouse is built on a 2x4 structure and it features a door to the front and a vent window to the back. Roof pitch is 2:12.*See full dimensions in the FEATURED IMAGES. *This is a PREMIUM PLANThe PDF file comes with:Cut Diagrams, Parts Lists3D diagrams with detailed step by step instructionsFull Cut & Shopping listsCut Layout Diagrams (show you how to cut the components, so you get minimal waste)Color Code (easily identify the components)Tools List, Time & Cost EstimateMeasurements are in imperialMeasurements are in imperial. The plans are for personal use only. MyOutdoorPlans or the its legal owners won't be liable for any loss, damage or injury arising from the use of information on this plan. It is your responsibility to make adjustments to the plans, to comply with your local building codes.Payment is managed by Gumroad and it is safe. Payment is secured by SSL with 128-bit encryption and processed with PCI Compliant service providers. Find out more here.Once payment is completed, you will receive an email from Gumroad (look in spam folder as well). Inside the email you have a VIEW CONTENT button. Press the button, then Download.
Step by step diy woodworking project about barn wedding arch plans. This simple wood gambrel arch is the perfect decor if you want a rustic atmosphere.
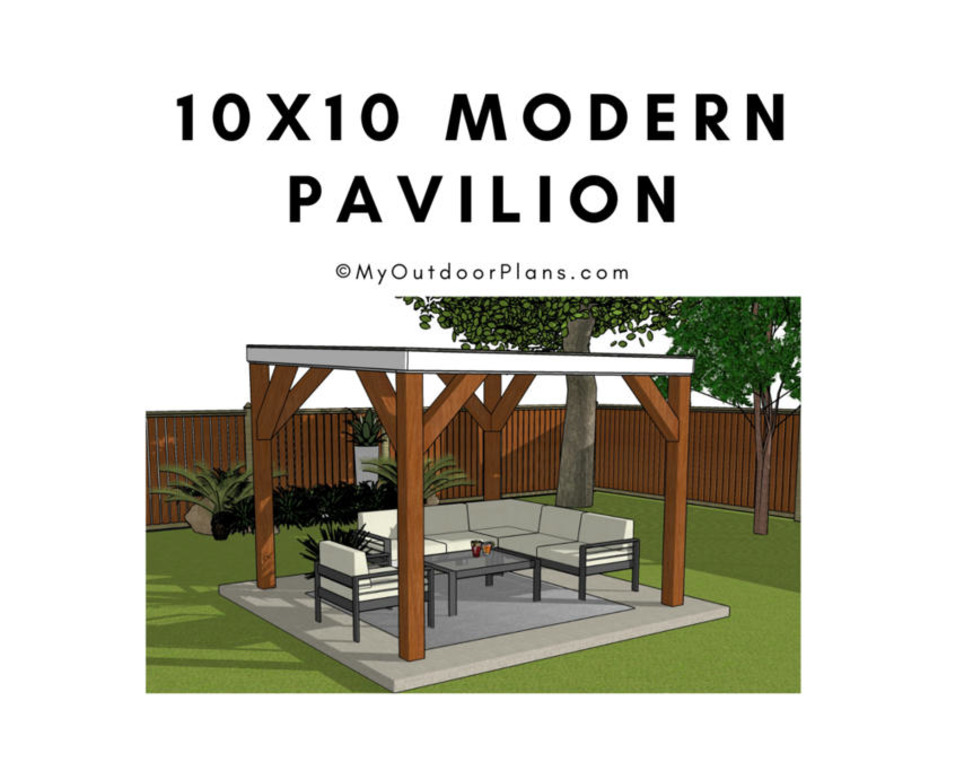
This step by step diy woodworking project is about 10x10 modern pavilion plans. This square pavilion has a modern design and it is budget friendly, and it features 4 posts with a footprint base of 10 ft x 10 ft ft. The roof has a 2.5 degree slope.This pergola features a sturdy structure with 6x6 posts and 2x6 rafters. *This is a PREMIUM PLAN*See full dimensions in the FEATURED IMAGES. The PDF file comes with:Cut Diagrams, Parts Lists3D diagrams with detailed step by step instructionsFull Cut & Shopping listsCut Layout Diagrams (show you how to cut the components, so you get minimal waste)Color Code (easily identify the components)Tools List, Time & Cost EstimateMeasurements are in imperialMeasurements are in imperial. The plans are for personal use only. MyOutdoorPlans or the its legal owners won't be liable for any loss, damage or injury arising from the use of information on this plan. It is your responsibility to make adjustments to the plans, to comply with your local building codes.Payment is managed by Gumroad and it is safe. Payment is secured by SSL with 128-bit encryption and processed with PCI Compliant service providers. Find out more here.Once payment is completed, you will receive an email from Gumroad (look in spam folder as well). Inside the email you have a VIEW CONTENT button. Press the button, then Download.
This step by step diy project is about 20x24 patio cover attached to the house plans. This lean to can be used as a carport or as a patio cover. If you like a simplistic design, this project will help you get the job done and save tons of money. Roof pitch is 1.5:12 (7 degrees). *This is a PREMIUM PLAN*See full dimensions in the FEATURED IMAGES. The PDF file comes with:Cut Diagrams, Parts Lists3D diagrams with detailed step by step instructionsFull Cut & Shopping listsCut Layout Diagrams (show you how to cut the components, so you get minimal waste)Color Code (easily identifiable components)Tools List, Time & Cost EstimateMeasurements are in imperialMeasurements are in imperial. The plans are for personal use only. MyOutdoorPlans or the its legal owners won't be liable for any loss, damage or injury arising from the use of information on this plan. It is your responsibility to make adjustments to the plans, to comply with your local building codes.Payment is managed by Gumroad and it is safe. Payment is secured by SSL with 128-bit encryption and processed with PCI Compliant service providers. Find out more here.Once payment is completed, you will receive an email from Gumroad (look in spam folder as well). Inside the email you have a VIEW CONTENT button. Press the button, then Download.
To get content containing either thought or leadership enter:
To get content containing both thought and leadership enter:
To get content containing the expression thought leadership enter:
You can enter several keywords and you can refine them whenever you want. Our suggestion engine uses more signals but entering a few keywords here will rapidly give you great content to curate.

 Your new post is loading...